Rm. 202 Kids Take Over!

This will be the first of several posts that document some changes that have been taking place in Rm. 202’s neck of the woods over the last two weeks.  We’ve been dealing with some struggles and are working on working through them.  Kind of like in the beginning of the year when we were working on working together.  Remember?  And in true Rm. 202 and Robinson form, we’re problem solving as a class to figure out what to do.  LOVE THAT!  It hasn’t been easy, but with so many great brains working on the solutions, it’s coming along.

Here’s the beginning of the story…

We had had many days where our class was struggling to follow directions, listen to each other (including me!) and struggled with working well as a group.  Of course I was frustrated, and knew that it meant something had to change.  Luckily, because I know that these choices mean they’re telling me something (rather than just that they’re bad kids, or trying to make me crazy, or that there is no hope! LOL), I choose to try to figure out how to help them change those choices, by teaching or reteaching behavior, or by restructuring some other part of what we do everyday.

And because I work in the best school in the best school district anywhere, I am lucky to know about using a problem-solving model with most every classroom bump in the road.  I learned years ago about how to use the ICEL protocol for this problem-solving and it came in SO handy to us lately.  Basically it helps you problem-solve through a variety of items, starting NOT with the kids in your class, but with how you are teaching them.

screenshot-2016-12-17-20-13-19

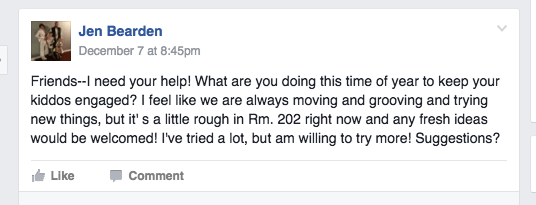
So as I worked through how to best respond to the struggles we were having, I logically started with the I in ICEL, which has to do with HOW we’re learning and HOW I’m choosing to present things.  Sometimes an easy tweak in this area can provide the response you were looking for.  And also luckily (wow–do you get how blessed I am? LOL), I have a super supportive group of coworkers who are ALWAYS willing and able to help.  We happen to have a place to post questions and ideas so I wrote this, looking for some suggestions:

screenshot-2016-12-17-20-38-37

And like I said, there ended up being LOADS of friends who gave their support and ideas for how we could respond, and even better than just helping me, anyone who read the thread could benefit. #collaborationforthewin

This response was what got us to this blog post today:

screenshot-2016-12-17-20-42-03

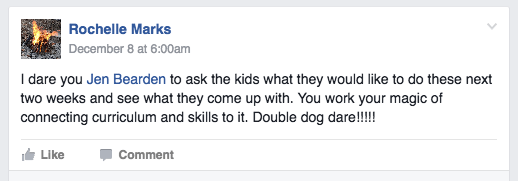
And since I cannot step away from a double dog dare, but more because I knew she had a point with her suggestion and was thinking we’d get some good results from it, I started our next day with this as our easel question:

fullsizeoutput_124a

Apparently I haven’t asked a question like this in a while, or they are programmed to answer this “learner” question in a certain way, because on our first draft thinking, their responses were “be quiet” or “listen to the teacher” or “be a good friend.”  Of course those are all good things, but what I was asking was more like the answers on this second draft are responses I as expecting.  The notes are grouped by type and the big pile at the bottom (not surprisingly) say PLAY.  The rest say things like READ, WRITE, CODE, and DRAW.  And yes, there were at least two that said they’d enjoy doing anything.  Yes, girls, you’re my favorite students.  LOL  Just kidding!

We gathered for morning meeting and got busy building our schedule for the day.  Again, this surprised my students MUCH more than I thought it would; I think I give them choice ALL THE TIME and work to be really responsive to what they need and want.  Funny that this seemed so crazy to them.  Anyway, we decided that they could choose to do something from the list of blocks/cars, art, Legos, or iPads.  We also reviewed how, since this was normally the time when we did writing and sci/ss, they had to figure out a way to include those things in their work.  I also gave the offer to let some friends help me start a bulletin board that first grade was in charge of making–4 friends took me up on this offer.  The rest made their choice and got busy with their learning plan for the day.  They had to start in their area by talking with the others kids there about how they’d use the tools they had available to them.  As we got busy, I shared with them that we would stop to share our work after a chunk of time (I think I gave them about 40 minutes).

Once they had time to work on their creation, we gathered in each area so groups could report to us on how they spent their time.

When we returned later in the day, we got busy writing a report on how we had spent our morning.  More on that later!

Oh, and I know you want to know how it went….this was one of the most pleasant mornings we’ve had together in a while. 🙂  They had choice, they were engaged, they managed their bodies and were in charge of their learning.  And I went to lunch with a smile on my face (for whatever that’s worth. 🙂 ).

Please be sure to come back for the next chapters of the story–it’s a great one!  Rm. 202 kiddos have GREAT ideas! Can’t wait to tell you about it.

Learning to Draw From an Expert

Remember when Pacifique was here last year and we were SO EXCITED?!  And the year before when we first met them?   Well…since then we’ve developed quite a close relationship with the NIYO Cultural Centre and are lucky to be able to learn from these amazingly talented artists often.  This time Pacifique brought some new friends–Patrick and Figy.  Last time we focused primarily on music and dance, but this time Figy has been able to share his painting talents with us.  WE WERE EXCITED!

First, he did a little bit of pre-planning and basics instruction at the easel.  Everyone really wanted him to start by drawing tigers and lions, but Figy helped us understand that we have to start with simple and THEN we can stretch out and do some harder things.  We were going to start with butterflies.  Just like the lesson Ms. Holzmueller had done with us the previous week, he showed us how butterflies are made of shapes we already know, like ovals.  Easy peasy!

Once we had sketched our butterflies, we gathered for a painting lesson.  Figy is a master with watercolors and had much to teach us.  I was so excited to learn a tip that I had never learned: before you start painting, you “paint” the paper with water!  This helps the paint then “float” around on the water.  SO BEAUTIFUL!

After this next part of the lesson, we tried out hands at adding color to our own creations.

We weren’t finished yet, though!  We would leave them to dry overnight, and then trace the details on top of our paint with permanent marker.  WOW–what a great combination!  Check out Figy’s example he made for us:

fullsizeoutput_f58-min

AND THEN (as if it hadn’t already been an amazing time together!), he called kiddos to the rug as they finished painting, telling them he had a secret to tell them.  He quickly had a line forming in front of him as he whispered quietly in each kiddo’s ear.  No one except that kiddo had any idea what he was talking about!

We soon found out that was he was talking to each kiddo about was what other animal they might like him to draw and quickly a pretty impressive list started to form on the easel paper.  And then he started drawing them for us!  Right before our eyes they begin to appear on the paper, like a colorful 2D zoo!

Did you notice what started to happen as he added animals to the paper?  Kiddos were so inspired that a whole new drawing lesson ensued and everyone was trying them out, too! Love it when that happens.  You don’t even have to invite them or suggest that they do it–just showing them is all the invitation that need! So organic. 🙂

So then Friday when we came back, we took our turn with the Sharpies and finished our paintings.  Aren’t they beautiful??

We were so inspired and thankful to Figy for sharing his talents with us!  We have even started another watercolor painting project in math that we’ll finish this coming week, too.  Stay tuned for updates on how we transfer this learning to another situation! 🙂

Rm. 202 Literary Lanterns Project

A few weeks ago I started seeing tweets about Literary Lanterns and they were so interesting to me.  Basically think of a pumpkin painted like your favorite book character, and that’s what they are.  We toyed with the idea of doing this on a school level, but it didn’t happen, so Rm. 202 decided to do it for ourselves!

First I showed my friends some examples of some pumpkins other kids had created, since I figured most of them didn’t really didn’t have any idea what I was talking about. 🙂

screenshot-2016-10-21-14-46-12

Then we brainstormed a list of characters kiddos would like to create, with two minor rules: NO ONE could do Piggie or Elephant and NO ONE could do the Pigeon, because well, EVERYONE would want to do those characters and that would be a very boring pumpkin display.  Once everyone was clear on those guidelines (which really meant that EVERY OTHER BOOK CHARACTER in the world was fair game), kiddos got busy creating a list of ideas.

I pulled up our book pictures on our ActivBoard, and many also studied our door display (see?  Another reason why this project has been SO GREAT!).

Originally I was going to take our ideas and make a list and then have everyone pick the one they wanted, but instead had them circle the one they most wanted to create on the list they first brainstormed.  Then I just had to cross-reference everyone’s choice (which was much easier and much less work!) and surprisingly it all worked out really nicely.  Some kiddos were paired up (if they chose the same book) and some worked alone.

These choices were made on a Friday, so that kiddos could then work at home over the weekend to secure their pumpkin and any other supplies they might need.  To my surprise and delight, this showed up on Monday:

img_4885

Once we had our pumpkins, our plans and some time, we got busy!!

Oh my goodness they looked great!

Then we had a super idea about how we’d share them with our Robinson friends.  I asked Mrs. Meihaus if she would let us make a display of them in the library so we could show up our hard work and creativity, and she so kindly said YES!  Most teachers at Robinson know about our #classroombookaday challenge and how this went along with our crazy reading love, so were interested in what we were doing anyway.

Then we had another great idea: we would use this project as the basis of our learning on elections and voting.  Our display was set up, we created a sign to hang above our pumpkins and then everyone of them was numbered.  I created a Google form for Robinson friends, family and teachers (anyone who views the display, really) to cast their votes and now we’re off!  We are so proud and very excited to see what happens with this project now that it’s in place in the library. 🙂

And without further ado, here are our final products:

This slideshow requires JavaScript.

We’d love to include you in our voting, too!  If you’d like to vote for YOUR favorite pumpkin, scan the QR code or click on the link below and cast your vote!  We’d LOVE to see how far this project can spread outside of our walls in Missouri, so please also share where you live!  THANK YOU in advance!!

screenshot-2016-10-31-20-36-24

goo.gl/PXrKZb

Dot Day UPDATE: We Made Our Mark!

I hope that you have already enjoyed the story of our Dot Day 2016 celebration, but if not, you might want to check that out first, and then you will have an even better idea of how we got here.  This is an update–one thing I forgot to share (what??) and our amazing paintings that weren’t ready to share yet.  Believe me, these MARKS are amazing!

First our favorite parts of Dot Day (not surprisingly, it was the DOTS for most kiddos!)

fullsizerender

Now the BEST part.  🙂  We made dots and watched them splatter…and we wrote about them, too!


Ten Black Dots Makes a…

…really great book to challenge first graders with their creativity!  Last week I shared how Mrs. Berger is doing some lessons with first grade and this week was #2.  First she shared the book Ten Black Dots by Donald Crews, which was a great connection to our current math work as well as a great stretch for our creative brains.

Then she asked me to do something that I guess I knew was coming but had forgotten about since last time we did this (2014): use 10 black dots to create something.  I usually appreciate doing things that my students are asked to do, as I know that understanding the struggles that may come up helps me support students through them, but I had forgotten how hard that task is!  I came up with something, but let me just want you it was a little less than stellar. 🙂 Ok, sorry, I know that is a very fixed-mindset thing to say…I take it back.  I just believe if I worked at it I could create a much more imaginative picture with my dots.  (Thanks to Chase for being the photographer while I was working on this!)

After my demonstration, kiddos were given an office and a paper, chose 10 red dots and got busy on their creation.  They worked for about 10 minutes on their 10 red dots, including writing at the bottom to tell about what they made.

And just like with the drawing starts, kiddos did a great job of seeing those dots as so much more than they were!

This slideshow requires JavaScript.

Another great example of stretching your brains, Rm. 202 friends!


Not a Box!

One of my favorite beginning-of-the-year things that happens at our school in first grade is a series of lessons that Mrs. Berger, our teacher of the Gifted and Talented, does with kiddos.  The first one is based on the book Not a Box, and is a series of drawing starts.

We showed up in her room last Friday and she first read to us:

The bunny in the story has a box…that is not a box, but is loads of other interesting things in his imagination.  After the book, kiddos were given the same invitation to take something and make it “not that thing” by adding details and thinking, well, outside the box.  hee hee

Creativity is such an important part of learning, and seeing things in more than one way is a skill that I hope to be always encouraging and fostering in my kiddos.  Check out what we did so far!

This slideshow requires JavaScript.

Great start, Rm. 202 kiddos!  Excited to see what you do next time with Ten Black Dots!

Dot Day 2016: Too Much Fun For Just One Day!

If you follow Dot Day or you have been to the official website, then you know the date for Dot Day is advertised as “Sept 15th-ish.”  Now being a fan of the Reynolds brothers, I figure there’s probably a joke in there because of their amazing book Ish, but I also love that it probably just means teachers can have some freedom in when they celebrate.  I mean, we all know that things like that can rarely fit so nicely right into our schedules.

We were able to take advantage of a great Skype invitation from Ms. Hachen’s 2nd Grade Ms. Hachen’s 2nd Grade class to take place on Sept. 15th, and so in order to have something to talk to our new friends about on that morning at 9 am, we did our “official” Dot Day work the day before.  If you have visited 20somethingkids before, then you know Skyping is not a new thing to my kiddos, BUT this was to be the first one this particular class had made.  I was excited and I’m pretty sure that until it happened, many of them didn’t know what we were doing. LOL

Ms. Hachen and I had planned to have our kiddos share their dot art, and tell the rest of the class what they decided to do to “make their mark.”  We gathered on the floor in front of our screen and computer, and oh my goodness I wish I would have taken a video of what happened next.  You can imagine I’m sure…I turned on Facetime just to give them an idea of what it would look like  once we got started and everyone started making faces at themselves in the camera, putting bunny ears on their friends, waving their hands…you get the idea?  I mean I guess I couldn’t really blame them–if you have never seen yourself on screen before like that and you are a 6YO, you’re probably going to do something goofy, right? So I asked them to get all those sillies out and then we waited patiently for our friends to call.  They did, and we listened to our new friends from Kansas (hey, they’re our neighbors!) tell us about their Dot Day creations.

It looked and sounded a little like this:

You know, I love it when I watch videos of things that happen in our classroom, because I often notice or see new things that I didn’t notice in the moment.  Honestly, I remembered that many kiddos were NUTS and had a hard time being patient as we watched and listened, and I remembered having to give many reminders for them to be respectful audience members.  I’m so glad to see that most of them did a GREAT job of waiting, and am not surprised to see that there are still some who REALLY wanted to show off their art work.  I’m going to take that as a sign that they were really proud–and that we need more practice with Skype. LOL  No worries, we will get lots of that as we go through this year. 🙂

When we were finished with our Skype, we had some other things to do (like regular 1st grade curriculum stuff!), but we came back to another art challenge later in the afternoon.  I had seen a blog post about creating a circle painting with your class and wanted to try it.  After all the paint fun we’d had the day before (did I mention that we had to throw three kiddos’ clothes in the washer?), I needed to figure another way to make it work.

screenshot-2016-09-18-17-47-27

We didn’t exactly follow the directions, as we didn’t use paint, and I didn’t have them only paint circles, but we did indeed work together to make our marks on a class art piece together.  That was really my big idea anyway, regardless of the medium.

So, we started with a big yellow piece of paper, 8 kiddos and a box of markers.

img_4004

They were given 30 seconds to work at the part of the paper that was in front of them, and then we rotated around the table.  They were supposed to add something new to the picture that they moved to next.

Not only did we create a BEAUTIFUL art piece together, but not a single person fussed during this time, nor did anyone argue, fight over a spot, or not follow directions.  It was quiet, ran smoothly and kiddos seemed like there were really enjoying themselves!  They took this “making our mark together” business really seriously. 🙂

And then when we were finished (we went through three rounds of 8 kiddos each), we had to do the most important part–sign it!

I have not had a chance to frame it yet, nor have I decided where to hang it (we should decide on that together, I think!), but I am surely impressed with what we were able to do.  My favorite part?  When I heard Johnny say to me as he rotated to the next spot, “I think this is supposed to be a carnival, so I’m going to add part to the roller coaster!”  What a great example of paying attention to others’ intentions.  Saw that happening all over the place after he said it.  Way to go Johnny and Rm. 202 friends!

img_4019

Just for fun, a few closer looks:

This slideshow requires JavaScript.

Ok, and just one more.  It was a good thing we had Double Dot Day, because on actual Dot Day I wore stripes to school.  I know, wah wah. 😦  But I remembered the next time and was excited to sport the RIGHT outfit!

img_3979

Oh, and look–they’re even DOUBLE DOTS!!  Like it was meant to be. 🙂

What a great couple of days focusing on reading and creativity, helping and working together!  Thanks for reading and ’til next year, keep on make, make, making your mark!!

#FDOFG: …yet

I have written before about how important the word YET is in the lives of my students.  Well in my life, too, actually.  Even though it’s only the third week of school, I’ve already found many opportunities to help kids change their words from totally negative grumblings of “I can’t do that” to “I am not great at that….yet!”

And so like I’ve done with previous classes (this is one of those beginning-of-the-year activities I left pretty much the same because it works for almost everyone!), we talked about caterpillars and butterflies in relation to the idea of “yet.”  And then we got busy being creative!

After our butterflies were dry, we worked on adding a goal to them using this stem:

IMG_3515

It was interesting to see what kinds of things kiddos wrote; some were related to things in school (like reading, writing or art) and some were about other things like bike riding, cooking, and some were applicable to all parts of life, like waiting or listening.  I’m excited to watch as these caterpillars develop into beautiful butterflies and  they see their “not yet” become NOW!!

IMG_3550-min

Later these will hang in our classroom so we can be inspired by them each day, but for now they are on view in our hallway.  So great and SO PRETTY!!

**On a side note…the pictures from our work time were taken by Ms. Mimlitz (a FABULOUS teacher who works with us in 1st grade!), and may seem different than the ones I usually post.  I asked her to take care of documenting this activity because I was busy helping out as they worked and it was so interesting to see how someone else “sees” what kids do.  The process was so much more beautiful through her eyes; I realized my pictures never have kids faces, just them working.  I had chosen to do that purposefully in order to highlight the thinking, working, creating, PROCESS, etc., instead of interrupting kiddos to cheese at the camera….but as I see that the photos she took are so much more interesting to me, and I can see the JOY of the learners as they are working (I appreciate this as a teacher, but also with the parent hat on–I know I love to see the faces of my own kiddos smiling back at me on the screen!).  Now that I am reflecting on it, it makes me wonder how I’ve never connected the fact that the absence of students’ faces has meant that a HUGE part has been missing!  Seems so simple but such a big deal…I am there for those precious kiddos, and I WANT to see that they are both busy and enjoying themselves!  As I go forward, I will be looking both at what they are doing as well as HOW they are doing it.  Thanks, Ms. Mimlitz for helping to open my eyes to seeing my students and how I share our stories on our blog in a different way! 🙂

What do you see when you watch your kiddos working?  Did you notice the difference in pictures?  How important is it to involve students’ faces/expressions in the storytelling? How do you involve students in the documenting and recording?  I’d love to hear your thoughts!

Lego Organization: From a Builder’s Perspective

For my son’s 7th birthday I promised him a “new” room.  He had grown out of his “big boy” transportation room (which was really just a more grown-up version of his nursery), and needed something that could last a few more years as he got older.  As may 7YOs, he was TOTALLY into Lego, and it seemed a likely theme that would work for now, as well as for many more years.  I knew that if I made sure the background was neutral and the “changeable” stuff was where the Lego came in, that would also ensure that he’d have longer before it was dated.

Well, lucky for us me, I had just painted my living room/kitchen in a fabulous gray color that is pretty close to the color of Lego base plates, and had almost a gallon leftover!  This was the foundation we needed!  The walls were quickly gray and then I worked to figure out bedding, curtains, arts, etc.  I was hoping to sew most of it, but who knew that Lego doesn’t have fabric?  Well maybe somewhere and it sells for hundreds of dollars a yard, but I could not find any in the traditional fabric stores around me, or anywhere I could think of online.  It ended up being a blessing in disguise, however, because we ended up finding options that were far more basic, and which allowed me to be a little crafty.

We landed on this bedding, and I found the pillows (and some other ideas we didn’t end up using) here.   It is reversible, too, so I think right now it’s even turned over the other way.

For art, we had many ideas, but only ended up using a few of the ones we started with.  One was pretty basic, and is just paper, made to look like Lego 2x2s, and the other stuff we added is not Lego-related, but is instead kid-made art from my master builder’s work at school.  Made it even more special!

IMG_2407

We used record album frames because they’re cheap and the size shape!  Just paper, with paper glued on top. 🙂

FullSizeRender

Every year our art classes do a project through Art to Remember, and parents can buy all sorts of “stuff” with their kid’s artwork on it.  We have ornaments and magnets and other things, but decided to use the original pieces as room art.  There are two empty ones because he has 4th and 5th grade to go!  (And yes, I realized they are neither perfectly-spaced or entirely-straight, but for now it’s working pretty well!  (That’s the closet wall)

Ok, so that’s all well and good, right, but I know you’re asking “so where’s the Lego organization part?” Well, ok, I promise it’s coming, but first I must sneak in a little bit of info (that you may have already figured out), and that is the fact that my 7YO just turned 9.  (We are a little slow to finish things around here! LOL)

Part of our problem was that the Lego organization was the project that required the most work and planning in order to complete.  We had ideas for adding a window seat with cubbies, that would allow for block storage as well as a place to play.  We did LOADS of research, and finally decided upon buying pre-made shelves that we turned on their sides so they’d fit under the window.  The detail that took me FOREVER to figure out, though, was that there is a vent right in the middle of the floor under the window.  We didn’t want to cover it up, and couldn’t decide how to deal with it.  Somehow, 2 years into it, I figured out that just adding legs to the cubbies would raise them above the vent, as well as making them the right height for the window seat we wanted.  A couple of coats of black paint (to match the other furniture in the room) and voila!  Win/win.  Well except that he waited on it for 2 whole years. 🙂

IMG_2318

Again, though, as we like to find the positive in all things, the two years he has spent collecting and building with Legos actually helped us in completing this project because of the knowledge he’d gained and the opinions he had on how he wanted his Legos organized.

Oh, and those two years also afforded him time to collect thousands and thousands of tiny bricks and so many specialty pieces I can’t even begin to tell you how many there are (most of his Legos come in sets, which contain loads of really specific blocks).  And those thousands of blocks have been living in a giant under-the-bed sweater box like this:

IMG_2326

which meant that our first job was to pull out every. single. piece. and figure out what we were working with.  After that, we could decide what kinds of containers we needed to put them all away again.  This step honestly took two full 8-hr days to complete.  And it was mostly me working on it.  Yep, the kids were there to start us out, but they quickly had much less energy (or excitement??) for it than me.  I was bothered by this for a minute, seeing as it seemed like it was more for me than for my master builder, but I think it was just too big of a job for kids to be able to finish.  They couldn’t exactly see my vision for the end-product anyway, and so this detail-oriented part was ok for me to finish on my own.  The introvert in me kind of likes that sometimes anyway. 🙂

IMG_2325

I spent much of last week surrounded by lots of little boxes and piles of different kinds of Lego bricks.

In the time when I was doing my first round of research for how to organize our blocks, I found many examples of how moms had used IKEA products, and honestly they were all very nice looking.  And probably very expensive.  But, they also didn’t look very user friendly.  Most were organized by color…which I’m pretty sure is not how most kiddos build (or at least not mine….seems more like something a mom would do for herself, not for her kid.  Regardless of how other families did it, though, that method was not going to work for our mounds of Lego bricks). I mentioned that those 2 years gave my builder time to really understand himself and his preferences and this was great as we sorted through them all.  So I started by asking him what he thought we should do, and he agreed that color didn’t make sense, and that instead, we should do it by type or size of block.

After those 2 days of sorting, an afternoon of planning for containers and then shopping (we ended up choosing Sterilite containers that I found for a steal at Big Lots), gave us what we thought ended up looking great and being REALLY user-friendly.  I have been told by my kiddo that it is working really well, and I would agree, since every piece has it’s place now.

And the best part is that there are labels on each box, that art both specific to our Lego pieces and our names for them.  Yep, there’s a box for “slanty” Legos, and one that says “holey” and well as once that just says “special,” which he uses for particular pieces he’s pulled out for a project and isn’t ready to put back in their appropriate box yet.

Oh, wait, and the top has a dual-purpose, too: it’s both for building and for reading.  We added two base plates to the top of the middle (attached with velcro), and I made pillows to cover the whole thing for when they’re not being used from a sheet I already had, and a tutorial I found here.

We are so happy with our final product, and it’s a part of our house that gets used (and cleaned up up!) every day. 🙂

IMG_2374

Teamwork is Tops in Rm. 202!

This month at our school there has been a door decorating contest.  Since our class seems to always be doing 10,000 things at once–all fun and motivating, of course!–I chose not to participate in this project.  It was running for the last two weeks and the classes on both sides of us (Hi, Ms. Turken and Mrs. Appelbaum!) have been creating amazing displays, and no one in my class has really said anything.  A couple of friends inquired in passing, but were fine with my answer of “We are doing so many other things right now!”  It wasn’t until the last few days of the contest when someone finally asked me about it and wasn’t so happy with my answer….instead of “ok,” he asked, “What if I do it?”  I am almost always on board with kiddos taking the lead on things, so I was willing to play the game with him.  I told him he could TOTALLY do it, if he was in charge of the whole thing and that the only time I had to give them to work was recess.  I have to admit I was a little surprised, but he was instantly on board.  This was Friday, so he was given the weekend “homework” of figuring out the theme, the plan and the ideas for how the rest of the class could help get it done.

I have to be honest that I was expecting him to come back on Monday having changed his mind, but instead he had a pretty well developed plan and excitement to include his classmates.  We made plans for who would come to join us at lunch and recess, and almost the whole class wanted to help!!

We only had from Monday until Thursday after lunch to complete our BIG job, so on the first day we brought our lunches up and worked for as much of our 40 minute lunch period as we could.  By the end of that day, we had the background up and a great plan for what we would do the next day.  Oh, and we ate our lunches. LOL

Can you tell our theme just by this picture?

IMG_0674

Well, if you know my friend who planned it, that would be an easy give-away, too, but I’ll just tell you that we had the theme of teamwork, shown through a football game.  We have a HUGE rival down the road in Webster Groves, so that’s the reason for the red and orange end zones. Our rough-draft plan looked like this:

IMG_0655

On this first day we had about 16 kiddos working and not many jobs, so I worked it out with one friend to be our photographer.  I needed pictures to document our work and he wanted to help, so bingo!  I am super happy I did it, now, too, because it’s so great to get a kids-eye-view on what we’re doing.  Obviously he took very different pictures than I would have (and I’m even in some of them! Thanks for being kind–LOL), and it makes me think I should hand over the iPhone more often!  Check out the work we did on our first day. Oh, and I didn’t edit them at all.  I kind of thought it was very organic and “real” with his fingers were in some of them.  I also love that you can see conversations happening in many of them, as well as how messy it is working with 2nd graders; I think often I try to crop and edit our life into just the right picture.  But you know, honestly sometimes we just watch.  And sometimes we leave big piles of paper laying around, and often it takes 6 people to do the job of 1 person.  But no matter what, we work together, solve problems together and have fun with each other.

This slideshow requires JavaScript.

Our second stop in the process was to create the field, with yard lines, names and goalposts.  Some friends started on bleachers and a crowd, but we quickly had to scrap that part for time’s sake.  Next decide about teams, then create football player and cheerleader versions of us to play the game.  For this job, I did give them some class time, as there really wouldn’t have been enough with just recesses to make that part happen.  We divided in half, created the parameters (7 inches tall), and even decided that we should have a mascot (Remember my photographer friend?  He was cast as Pioneer Pete!).  Again, here’s what it looked like while we were working, from a kids’-eye-view of the room:

Once we were all said and done, our entry into the door decorating contest looked like this:

I was SUPER impressed with how quickly it came together, with how well everyone worked together towards a common goal, and how willing my friend was to lead us all to this great product!  On Tuesday at the end of the day, as we were having our closing circle, more than one kiddo thanked him for being a bold leader.  What a great way to end the day! Way to go, Rm. 202 friends!!