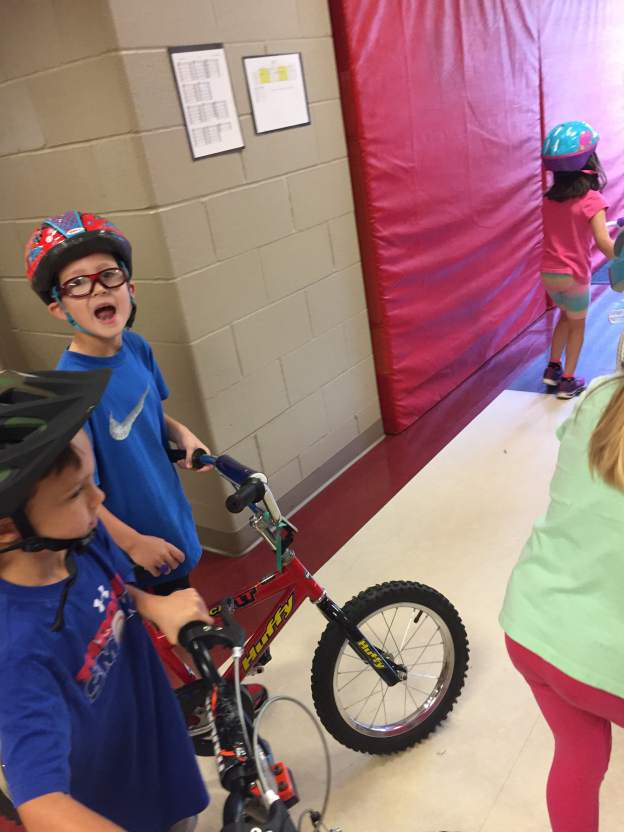
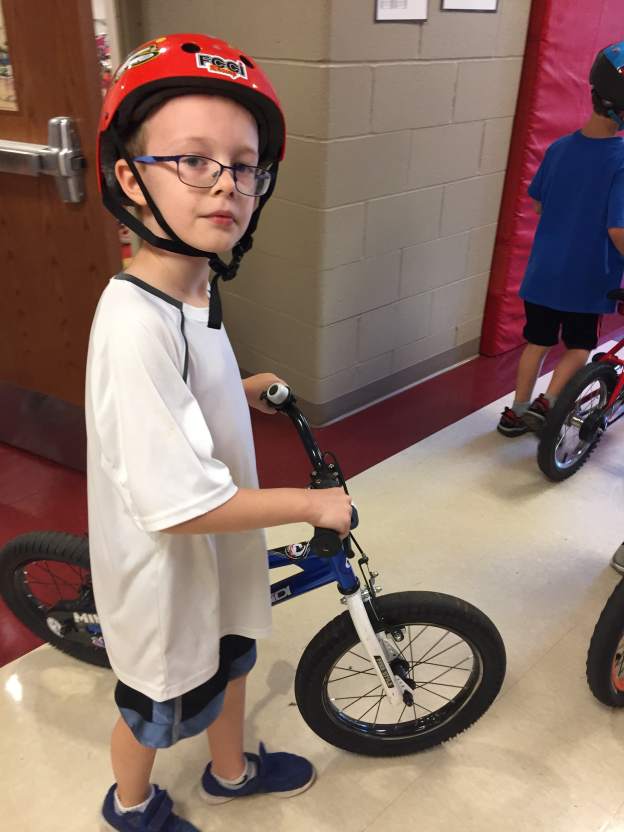
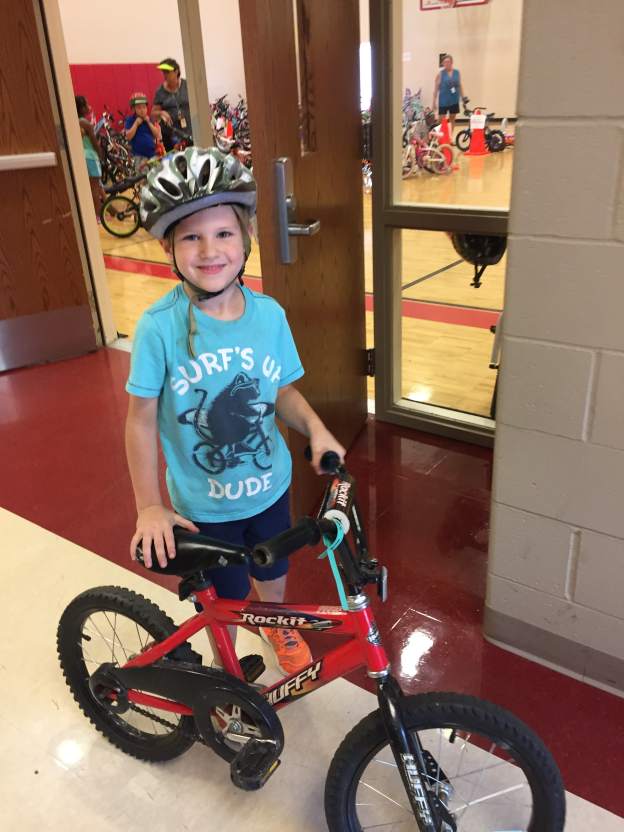
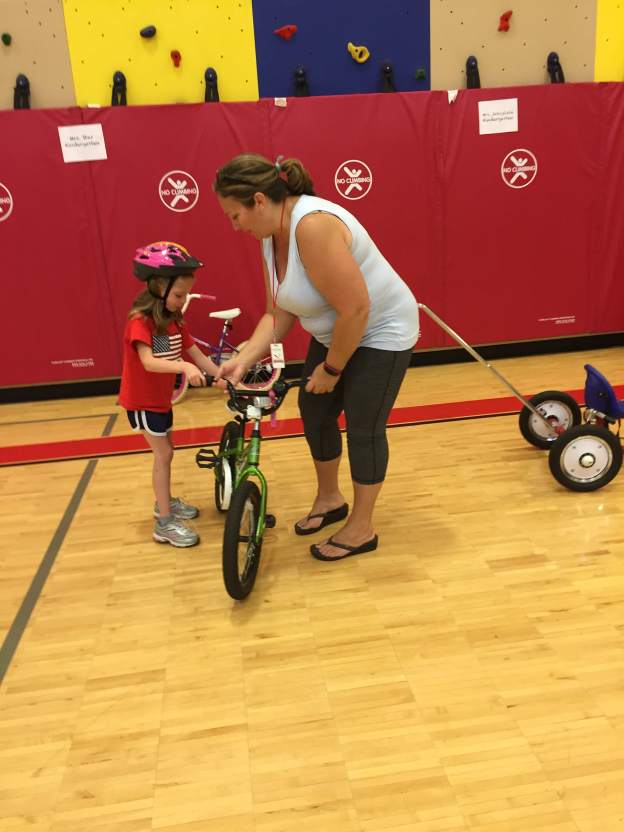
I am pretty sure we have the best school ever, with teachers and community members who plan THE BEST things for our kiddos to do. Case in point–last week we participated in a Bike Rodeo during our PE classes, where everybody brought their bikes to school (or shared if they didn’t have one!) and got to ride around the blacktop! There was an obstacle course, and I heard that kids had a GREAT time going down the big hill on the driveway. There were LOADS of kids who learned to ride without their training wheels, too! Officer Stemmler (our School Resource Officer), Mrs. Morgan and Mrs. Moffitt were such troopers as they braved the sun and heat and helped our Roadrunner ride and ride and ride! Thanks to all the parents to helped make it happen, too!
I wish I had pictures of the actual bike riding to share, but these will have to do. Just imagine kids zooming around really fast (see, there’d be blurry pictures anyway) with giant smiles on their faces!
…really great book to challenge first graders with their creativity! Last week I shared how Mrs. Berger is doing some lessons with first grade and this week was #2. First she shared the book Ten Black Dots by Donald Crews, which was a great connection to our current math work as well as a great stretch for our creative brains.
Then she asked me to do something that I guess I knew was coming but had forgotten about since last time we did this (2014): use 10 black dots to create something. I usually appreciate doing things that my students are asked to do, as I know that understanding the struggles that may come up helps me support students through them, but I had forgotten how hard that task is! I came up with something, but let me just want you it was a little less than stellar. 🙂 Ok, sorry, I know that is a very fixed-mindset thing to say…I take it back. I just believe if I worked at it I could create a much more imaginative picture with my dots. (Thanks to Chase for being the photographer while I was working on this!)
After my demonstration, kiddos were given an office and a paper, chose 10 red dots and got busy on their creation. They worked for about 10 minutes on their 10 red dots, including writing at the bottom to tell about what they made.
And just like with the drawing starts, kiddos did a great job of seeing those dots as so much more than they were!
This slideshow requires JavaScript.
Another great example of stretching your brains, Rm. 202 friends!
If you follow Dot Day or you have been to the official website, then you know the date for Dot Day is advertised as “Sept 15th-ish.” Now being a fan of the Reynolds brothers, I figure there’s probably a joke in there because of their amazing book Ish, but I also love that it probably just means teachers can have some freedom in when they celebrate. I mean, we all know that things like that can rarely fit so nicely right into our schedules.
We were able to take advantage of a great Skype invitation from Ms. Hachen’s 2nd Grade Ms. Hachen’s 2nd Grade class to take place on Sept. 15th, and so in order to have something to talk to our new friends about on that morning at 9 am, we did our “official” Dot Day work the day before. If you have visited 20somethingkids before, then you know Skyping is not a new thing to my kiddos, BUT this was to be the first one this particular class had made. I was excited and I’m pretty sure that until it happened, many of them didn’t know what we were doing. LOL
Ms. Hachen and I had planned to have our kiddos share their dot art, and tell the rest of the class what they decided to do to “make their mark.” We gathered on the floor in front of our screen and computer, and oh my goodness I wish I would have taken a video of what happened next. You can imagine I’m sure…I turned on Facetime just to give them an idea of what it would look like once we got started and everyone started making faces at themselves in the camera, putting bunny ears on their friends, waving their hands…you get the idea? I mean I guess I couldn’t really blame them–if you have never seen yourself on screen before like that and you are a 6YO, you’re probably going to do something goofy, right? So I asked them to get all those sillies out and then we waited patiently for our friends to call. They did, and we listened to our new friends from Kansas (hey, they’re our neighbors!) tell us about their Dot Day creations.
It looked and sounded a little like this:
You know, I love it when I watch videos of things that happen in our classroom, because I often notice or see new things that I didn’t notice in the moment. Honestly, I remembered that many kiddos were NUTS and had a hard time being patient as we watched and listened, and I remembered having to give many reminders for them to be respectful audience members. I’m so glad to see that most of them did a GREAT job of waiting, and am not surprised to see that there are still some who REALLY wanted to show off their art work. I’m going to take that as a sign that they were really proud–and that we need more practice with Skype. LOL No worries, we will get lots of that as we go through this year. 🙂
When we were finished with our Skype, we had some other things to do (like regular 1st grade curriculum stuff!), but we came back to another art challenge later in the afternoon. I had seen a blog post about creating a circle painting with your class and wanted to try it. After all the paint fun we’d had the day before (did I mention that we had to throw three kiddos’ clothes in the washer?), I needed to figure another way to make it work.
We didn’t exactly follow the directions, as we didn’t use paint, and I didn’t have them only paint circles, but we did indeed work together to make our marks on a class art piece together. That was really my big idea anyway, regardless of the medium.
So, we started with a big yellow piece of paper, 8 kiddos and a box of markers.
They were given 30 seconds to work at the part of the paper that was in front of them, and then we rotated around the table. They were supposed to add something new to the picture that they moved to next.
Not only did we create a BEAUTIFUL art piece together, but not a single person fussed during this time, nor did anyone argue, fight over a spot, or not follow directions. It was quiet, ran smoothly and kiddos seemed like there were really enjoying themselves! They took this “making our mark together” business really seriously. 🙂
And then when we were finished (we went through three rounds of 8 kiddos each), we had to do the most important part–sign it!
I have not had a chance to frame it yet, nor have I decided where to hang it (we should decide on that together, I think!), but I am surely impressed with what we were able to do. My favorite part? When I heard Johnny say to me as he rotated to the next spot, “I think this is supposed to be a carnival, so I’m going to add part to the roller coaster!” What a great example of paying attention to others’ intentions. Saw that happening all over the place after he said it. Way to go Johnny and Rm. 202 friends!
Just for fun, a few closer looks:
This slideshow requires JavaScript.
Ok, and just one more. It was a good thing we had Double Dot Day, because on actual Dot Day I wore stripes to school. I know, wah wah. 😦 But I remembered the next time and was excited to sport the RIGHT outfit!
Oh, and look–they’re even DOUBLE DOTS!! Like it was meant to be. 🙂
What a great couple of days focusing on reading and creativity, helping and working together! Thanks for reading and ’til next year, keep on make, make, making your mark!!
I have been a fan of Dot Day for a few years, and tried with my last couple of classes. Last year was the first year I seemed to get it on the blog, though, sharing our dot paintings and writing pieces that graced our hallway all year. They really were amazing. But as I went into this year’s Dot Day, I wanted to see what else there was out there to connect to the day and to the book it’s created from: The Dot by Peter Reynolds.
Because of my participation in most things Twitter, I found out about some great resources to use for Dot Day activities, and even had a place to share our Dot Day fun! I was geared up for an even better Dot Day than last year, and when the day came, kiddos were as excited as me!
We started the day by reviewing our plans and then, of course, reading the story! And who better to share the story of The Dot than the author himself? Yep! We had Peter Reynolds read to us from this video on YouTube:
After that, I actually reread to Rm. 202 kiddos again, to make sure they “got” the story and so we could discuss what was actually happening and also how this story perfectly connects to our Robinson Mindset:
We used some discussion questions that had been shared with me from my Twitter friend Ms. Hachen, and these really helped us understand Vashti’s problem, how she solved it and then how she made her mark on someone else in the same situation.
Then we enjoyed a song. Two or three times because it was so great. 🙂
And then after we got the point of the day and our minds were focused on dots and making our mark, we got busy actually DOING it!
I had put together a flipchart to give kiddos a visual of their art options:
and basically anything that was round, or could make a dot was fair game. And once they got busy creating, we were AMAZED at what we could do! We made dots and watched them splatter. 🙂 And thanks again to the AMAZING Ms. Mimlitz who was our photographer and took some great action shots of our work!
This slideshow requires JavaScript.
The final products are not quite ready to share (since I want to wait until they’re all hanging up and our writing is finished!) but you’ll get the idea as you check out our creative process. 🙂
Later on, it was time to have some more active Dot Day fun…
This was both Dot Day-related, as well as a great opportunity for us to continue to practice managing our bodies and using self-control as we work together!
After we had made our physical marks, thought about how we were like Vashti and could make a mark on the world, we did some reflecting through writing using this sheet:
We have done first drafts on these sheets, and will revisit and revise them next week so they can hang along with our paintings. I can’t wait to share them!
We had had a day full of DOT fun, and we had to end it with one more run through of the Dot Day Song. Just because it was so great! And we’ve all been singing it since then. 🙂
At Robinson we have a great tradition called Read With Your Roadrunner, where kiddos get to start their day reading with special people in their lives. Today was the first RWYR for this year. 🙂
We had lots of fun with our visitors today and we’re SO GLAD they came to start the day with us!
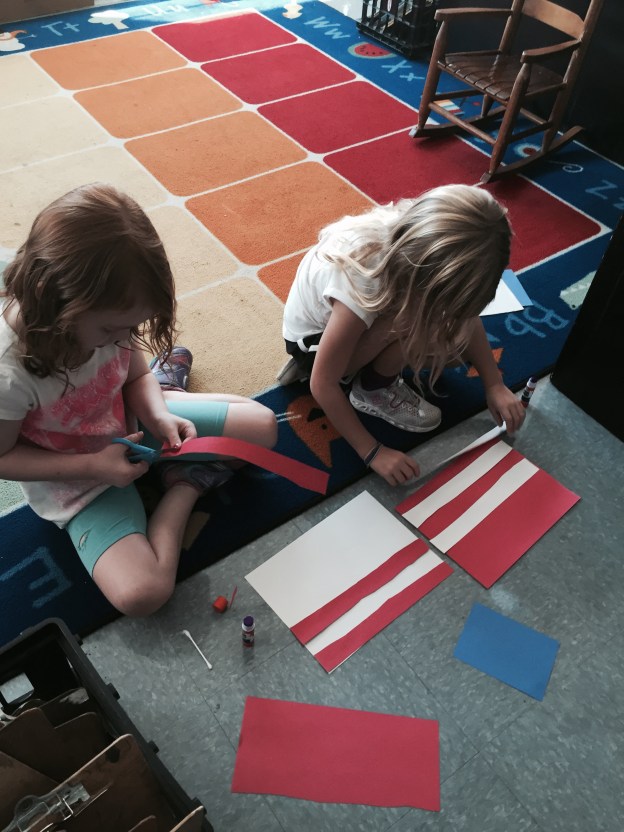
We’re first graders, and Civics is a big part of our fall Social Studies learning. We’ve been working on building community since day 1, which is a HUGE part of first grade Civics and learning to work together, but this week we moved into more “official” territory–starting with the flag.
Luckily, most kiddos come into first grade with at least some knowledge of US Symbols (like the flag, the eagle, money, the Liberty Bell, etc.), so we have a foundation on which to build.
We started with a great place: Annie and Moby from BrainPop Jr. :
After we watched the video and gained some new info on US Symbols, we focused in specifically on the flag, and then worked to create our own. Partly as a challenge, partly as a fabulous art piece, ad then also as a physical piece that they can use to remember our conversation and connect with as they remember the parts of and meanings of the flag.
We talked about the features of the flag, as well as the importance of each part, like how there are 13 stripes (7 red and 6 white) that stand for valour, hardiness and purity, as well as the 13 original colonies; there are 50 stars that represent the 50 states; and the blue part of the flag is called the Chief and is blue to represent justice.
Next I gave them three pieces of paper: one red, one white and one smaller blue piece. Then they were to make a piece that represents a flag, however they wanted to, using whatever other tools they might need (like scissors, glue, tape, etc.).
Much like many other things we do, this activity was bigger than the actual idea of making a flag. Like other requests I make of my friends, students have an opportunity to apply the Robinson Mindset all around them. And in this case, it came when friends got stuck. Along with remembering to “try one more time” like in the book that Mrs. Sisul read us, we could remind each other to use a growth mindset and work hard, as well as focus our minds on our work. The ability to apply this in almost every struggle we encounter is a blessing. And it worked. The smiles on the faces of these two friends when they had pushed through a hard part was priceless:
Another thing that came out of this project was how everyone tackled the assignment in such a different way. I gave them the paper but they really didn’t have any “right” way they were supposed to use it. As I looked at it, and thought of how the pieces would go together, I imagined that they would cut the red piece and attach it to the white–many did exactly the opposite! I love that picture of Rachel and Taylor working exactly the mirror images of each other.
I love that the flags are all reminiscent of flags, and you can tell what they are, but they are each a little different based on the historian artist who made them. Great work again, Rm. 202 friends!
Check out our patriotic work!
This slideshow requires JavaScript.
As I see them down the hall, I am again reminded how glad I am I hung this display space right there!
Picture books, Notability with pictures,inch tiles, Legos, games and paint?? Who knew there were so many ways to practice writing, reading and CELEBRATING our names? Well, Rm. 202 kiddos knew, because they’ve been doing loads of things with names lately!
As we continued our study, I shared another great book from the unit Mrs. Wessel shared with me:
This is a great story for many reasons. It’s a story about a refugee family, where the little boy is struggling with fitting in, and many keep mispronouncing his name. He feels like he’s “lost his name in America.” He comes up with a great idea for how to help his classmates (and teacher!) learn his name, and it includes pictures. I also love this book because it features main characters of color. We’ve been talking about (and reading!) books in our room lately with African-American characters and authors (as well as some that are of other backgrounds), and how important it is that kiddos see themselves in the books they read!
Well, along with reading this gem of a book, we send kiddos home with a little job to do. It’s a suggestion from the What’s in a Name unitWhat’s in a Name unit that was shared with me, and was too good not to try.
The sheet asked families to share their stories about the origins of student names, any family connections, info about meaning and nicknames, as well as what the kiddos thought were interesting about their names. What fun it was to go around the circle and share personal stories about kiddos’ names, and watch their faces light up as we talked about THEM and THEIR special details. We heard about things we never would have learned without this activity, and I think in many ways the special thoughts (and giggles) we shared here will continue to help weave us together as the beautiful quilt we will become. All different and unique, from different places and made of different cloths, but tightly stitched together with respect, experience and love. 🙂
After we shared the book and some stories, kiddos got busy creating art like Sangoel did (his name is pronounced Sun-goal, by the way). I gave each kiddo a slip of paper with their name written on it and they were to use a variety of mediums to create a colorful representation of themselves. Many chose to use what they had learned about the meanings of their names (Aadish means “sun,” Allie means “nobility” and Ayonna means “beautiful flower,” for instance), and others just added their favorite colors and patterns or images of things they like. Regardless of their choices, we will add this to the collection of beautiful things in our room that remind us of who we are and how special each one of us is. 🙂 Plus they look pretty great hanging in the hall right now. I LOVE our bulletin board out there!
We started talking about names last week and are continuing the conversation as we build our community together.
We’ve continued reading great books together,
and discussing the importance of our names and how they tell something about us as people. They are the first words we learn, they are letters we know, and they connect us to people in our families and our pasts. They are OURS!!
We worked on name building challenges as well, with inch tiles and with Legos (thanks for that idea, Ms. Lewis!), and we were able to document our work with our iPads (thanks Kirkwood School District!). We are learning more about how to show what we know, use GRIT when things are hard, share our ideas and questions with our friends, ask someone else before the teacher, and how to send that documentation (pictures, notes, etc.) to Mrs. Bearden in eBackpack. Seems simple, but it’s hard work in Rm. 202!
Inch Tiles Name Challenge
Kiddos were to build their name with inch tiles. They were challenged to try their last name if they got their first name quickly. It was fun and interesting to watch how each kiddo came at this challenge differently, which tiles they used and if they used capital or lowercase letters. They took pictures of their work when they were finished.
This slideshow requires JavaScript.
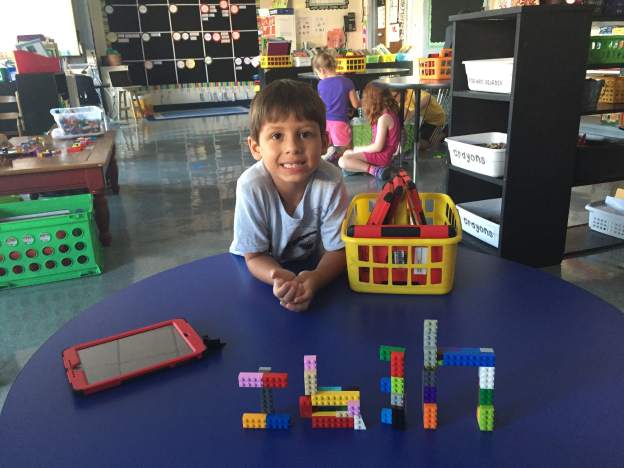
Lego Name Building Challenge
This time learners were challenged to build their name with Legos (one, two or all three–or four–of their names!). Then they were to have a friend take their picture with their creation. We’re still learning to take photos, so some of them are a little blurry. 🙂 The most interesting thing to me about this challenge was how many kiddos build their names in 2D, just putting the Legos flat on the table or floor, rather than 3D, putting them together and building their names UP instead of out (but yes, you will see in the pictures that a few friends tried it that way!). There were no specifications related to this, but I will probably add that parameter for everyone next time. 🙂
This slideshow requires JavaScript.
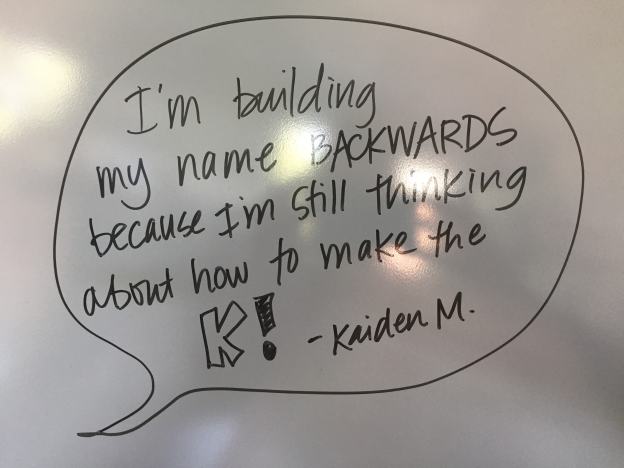
I have to take a minute and highlight a strategy that we discovered during our Lego building. I went over to Kaiden at one point and saw this:
If you can tell, he had only built the LAST four letters of his name. I asked him to tell me about his thinking and he told me:
We had to stop the rest of the class and have him share his thinking–this was a great example of what to do when you’re stuck, when you want to quit or you don’t know where to start: do the part you DO know how to do and keep thinking about the part you DON’T YET know how to do. Often you’ll figure it out while you’re working. GREAT JOB OF USING GRIT, KAIDEN!!
We already have done many interesting and fun things as we’ve started this new year together. And as we get into more “real” learning (yes, I know all learning is important and in many ways the “soft” skills might be more important, but I digress….had to call it something!), I am looking for ways to continue to stress the themes we’ve started with: everyone is valuable, we are different and we are the same, we support each other, we are all starting in different places and that’s ok–we’re all growing and learning together!
So when I saw this unit shared by our friend and AMAZING coach (and I don’t use the word AMAZING lightly) Amy Wessel, I knew I needed to find a way to use it–it matched up with all of those goals I already had in place. Plus it was interesting and fun and we LOVE those things!
Ok, so I didn’t follow the unit completely as written, but I did utilize the book list as well as the ideas for “homework” to use with families.
Let me tell you the story…
As you’ve already seen from our #classroombookaday tweets and posts, we are a class the LOVES to read and often bases lessons/discussions on a good book. So of course as we started to talk about our names, I went to the book list shared by Ms. Wessel, as well as some others I had found on my own at my library (which is another AMAZING thing!).
Together we read Hello, My Name is Octicorn (which isn’t so much about names as it is about accepting those who are different than us and making new friends but has NAME in the name LOL) and Thunder Boy, Jr. (which was surprisingly about a boy who has the same name as his dad and wanted his OWN name that told about him).
Then, since I wanted them to get into those iPads that had shown up in our room, we went on a little letter hunt around our room. They were supposed to find all the letters of their name, take pictures of them, then crop the images and upload them into Notability to build their name (which is similar to the directions from our Outdoor Adventure Writing Outdoor Adventure Writing from the other day, too). THEN they were to take a screenshot of that image and later send it to me in eBackpack so I could see it (and share it here!). Oh, and they were supposed to take a selfie to use as their lock screen (which is how we tell everyone’s iPads apart when they’re laying around). See? Told you they know how to do LOADS of things already!!
They’re a little messy, but I did write/draw the directions for them, since it really was a long list of things to remember and do:
They did a great job of following the directions, talking to each other when they needed help (I had to encourage this with some friends, as they are still learning that I am not the only one with the answers!), and sharing things they found out with the rest of the class. These images will become the Home screen on their iPads for now. Check out some of our creations!
Over the summer, at a ELA/STEM learning institute we attended for our district, Ms. Turken and I were talking about what we could do to better encourage at-home reading this year in 1st grade. While we do not necessarily require homework, being a better reader (and becoming a reader at all!) happens by reading. Lots of reading. We brainstormed how we could do more to get loads and loads of books in kids hands so they could practice each night with their families. We remembered a connection we had to books at school, but we needed a way to get them home…
So I sent out a call to my friends on Twitter and Facebook (because that’s what teachers do when they have a question, right?), and very quickly I had lots of suggestions. Mrs. Horn, a friend and teacher at another school in our district, suggested this DIY t-shirt book bag from Mommypotamus. It’s a no-sew project, so we figured it would be easy, and since we planned on having kids make their bags, we knew they’d be really excited to use them every day!
Ms. Turken’s class was able to make their bags ahead of us, and came to show off/model them as they were finished. Boy was I excited when a friend of mine asked, “Hey–do we get to make those, too?” and when I said yes, she smiled so big and did a little cheer.
Friday was finally our day. 🙂
And so of course I left ALL OF THE T-SHIRTS WE WERE GOING TO USE FOR THE PROJECT at school on Thursday night. Nice, right? Luckily, though, I was able to find just the right number of unused shirts to upcyle into beautiful book bags. Double nice, right? Whew–saved by the big pile of junk in my closet. 🙂
Before we could make our bags (which required lots of knot-tying), I had to do a little bit of prep work:
Take a shirt…
..turn it inside out and cut off the sleeves…
…and cut a scoop-neck rounded shape where the collar is.
Measure how tall you need your bag to be and cut the bottom into strips.
Tie them in tight knots all along the bottom…
…and voila! Book bag!!
In order to better facilitate such an involved project (it was simple, but still required some supervision to make sure the knots ended up in the right place), Ms. Mimlitz and I (remember her from our Outside Adventures? She is the totally amazing TA who works with all of our first grade friends!) pulled small groups while everyone else was working on must-dos and can-dos for the morning.
And I MUST give a shout-out to my small friend Keira, because she took to this project so quickly and ably that I gave her her very own group to lead! She was truly a gift that morning and helped so many friends get their bags finished. WAY TO GO, kiddo!
The plan once we are all finished (there were a few kiddos not there on Friday) is to fill our book bags every week with lots of great titles and read, read, read! Until then, check out how PROUD and EXCITED these first grade makers are with their creations!
I am SO GLAD we decided to take on this project, and once again–first graders rock!!


 and basically anything that was round, or could make a dot was fair game. And once they got busy creating, we were AMAZED at what we could do! We made dots and watched them splatter. 🙂 And thanks again to the AMAZING Ms. Mimlitz who was our photographer and took some great action shots of our work!