Today was a half-day at our school (because of teacher professional development in the afternoon), and so first grade took advantage of an awkward schedule to have an outdoor adventure! We have been outside with Rm. 202 friends before, but today were had ALL OF FIRST GRADE outside in the Robinson Naturescape learning and exploring together!
The teachers planned a STEM day focused on our current PLTW unit on Light and Sound, adding in the component of the AMAZING outdoor spaces we have in the back of our school. We took out a tub with a variety of tools, like binoculars, magnifying glasses, color tiles, flashlights, mirrors and spectroscopes. Kiddos had the job of exploring outside and discovering something new about light. Eventually we will have to represent that learning (using iPads, drawing or building tools), but for now we were just out and about and having fun with wondering!!
This slideshow requires JavaScript.
As you watch the slideshow with your kiddo (if you’re a parent!), ask them these things:
What was your favorite part of being outside today?
What was your favorite tool to use as a scientist? How did you use it?
What did you find outside while you were exploring?
What did you learn about light?
What do you still wonder?
We came in and as a quick way to debrief, I had kiddos share what they were thinking about after their adventure. While you can tell that they were thinking of many things other than light (like dead animals–we found a DEAD RACCOON back there today!!), it was obvious that kiddos were thinking and having fun, and that they LOVE BEING OUTSIDE! I think at least half of my kiddos asked me when we’re going out again. 🙂 I’m excited to see how we can use this chart of great ideas in other parts of our learning soon, like for reading and writing ideas, topics for math and even further thingsto study for STEM or Genius Hour (which we’ll get to later on this year!).
We are super lucky to have loads of new resources for science this year from Project Lead the Way, courtesy of a grant from the Kirkwood School District Foundation. It means we are able to add in so much more hands-on learning, and focus more deeply on engineering, design and coding in STEM this year, which is GREAT!!
Our first STEM unit this year is light and sound and we have been doing some really fun things already.
Before we even got into the unit, we did some things to expose kiddos to the big ideas, and to get them interested. One of those was to invite a Kirkwood Scientist, Mr. Bartin, to our classroom. Ok, well really Ms. Turken invited him to Rm. 203 and we tagged along, but he was here to share some interesting ideas about sounds with first grade.
Then we had some time to explore in non-fiction books from the library that we explored with a partner. Kiddos were responsible to read a light book and a sound book (or one that had both topics together) and then create a representation of something they learned or something that was important from their reading out of play-doh (and somehow I don’t any pictures of their creations! Boo. Believe me–they were great. 🙂 ).
Then once the unit started, it was with a story to help set the stage. This one is about three friends who have a problem: they get lost in the woods while on a walk with their class. 😦
As we work through the rest of the unit, we will learn and explore with light and sound and eventually be presented with a design challenge much like our friends in the story.
We began with some exploring with some everyday objects (that someone might have in their backpack on a hike!):
We are keeping track of our learning in a Launch Log and will be able to go back and review it throughout the unit. We’ve just begun light explorations and will even spend the whole morning tomorrow outside as scientists with common objects like flashlights, magnifying glasses, and more! Can’t wait to share what we learn!
By the second day of school, my new Rm. 202 friends were already asking me about why we didn’t have a class pet. What?? Were they serious? They had found out about Mrs. L’s turtle, Javy (because of a sibling we have in 4th grade), and many had seen Ms. Turken’s water turtle, Bradford, who lives next door to us in Rm. 203. And so already my friends were turtle-crazy.
The problem? It was the second day of school, I didn’t have a turtle, nor did I really know anything about them (or had we decided yet as a class if we needed one or could take care of it!). So Ms. Turken and I devised a little plan: her class was going to learn about turtles anyway, because of Bradford and their interest in them, and they could teach us about what we might need to know about what would be the best kind of turtle to have as a pet (I had noticed that Mrs. L’s turtle–who is actually a “cousin” to Bradford–is a box turtle, as opposed to Bradford, who is a water turtle): box or water.
Well, they worked and researched and wondered and wrote and last Friday they were ready to share their information with us. They came over after lunch on our half day to present their research. We were SUPER impressed with how organized and professional they were with their words and how well they used the microphone, stood so we could see them, and were so quiet and listening when it wasn’t their turn. Again a group of first graders was knocking my socks off!
Like I said, Rm. 203 friends were SUPER turtle researchers and taught us a lot. And yes, now our turtle craze is even greater than before. We even found this book to read together to teach us more:
And luckily, I now also have a connection to a turtle. Updates to follow on whether or not a turtle joins the Rm. 202 family to come….:)
On Tuesday we spent the morning outside. Shortly after our morning announcements, the pledge, Morning Meeting, and a quick Pinkalicious story shared by Rachel and read by Ms. Mimlitz , we headed across the street with our iPads in hand with some important work to do.
Once we get settled under a grove of really big, shady trees, we read a couple of books together (which is part of our regular routine, especially now that we’re keeping track of our books with #classroombookaday), and played a rousing game of Simon Says.
Next, I gave some directions for collecting some important information. Kids had been a bit distracted by all the nature around them anyway, so their next job was to “collect” the most interesting things as pictures on their iPads. After walking a big circle around the area to show kids their limits, I set them loose. They were given about 15 minutes to check out all they could find and WOW was there a lot to look at! There were even some kind horticulturalists working nearby that pointed out some things for us to see!
During this time we had an emergency drill (which was handy since we were in our emergency drill spot anyway), and since it was probably already 90 degrees and we were HOT, we headed back inside shortly thereafter.
But we weren’t finished! The next step was for kiddos to crop their pictures, zooming in on the MOST INTERESTING part of the photo. I wanted them to really think about why they had taken the picture, as well as what the story was about that image.
These were the next directions. And let me tell you (and I’ll elaborate about this later on, too) that it is a little UNBELIEVABLE that kiddos know how to do this already at this point in first grade!
Kiddos did some great work, and we will build on this as we work together this year.
Check out our Outside Adventure WRITING!! Like I said (and I’m sure I’ll continue saying it!), what these kiddos can do with their devices already is nothing short of amazing!
This slideshow requires JavaScript.
Thanks for reading! Please leave us a comment and join the conversation!
Since we had been studying slow changes and fast changes in Science for a while anyway, it made perfect sense to try it out! And unfortunately, there had also just been some major earthquakes in both Japan and Ecuador that same weekend, so the idea of creating earthquake proof buildings was a real life one to solve. And yeah, it would be fun. 🙂
We began by reading a pretty great Seymour Simon book on earthquakes to gain more information, and answer any questions that might come up about how they work. Knowing exactly what happens helps us build stronger buildings that would withstand the tremors.
We talked and discussed and made predictions and inferences. Then we got with our partners and planned–most on paper and some with some help from their iPad.
Then we got busy building. The 1st building part was actually spread over two days (an afternoon and then the next morning) because we ran out of time.
This slideshow requires JavaScript.
We used this design cycle protocol to help us know what to do, and wrote down the timing so we could keep on track.
Some even tried out their prototype on the earthquake machine before the “real” deal. They got some ideas about redesign or shoring up their foundations.
Caught some groups in their planning stages:
We took videos of our trials, and many kiddos voiced their ideas for redesign in their recordings. We all did some writing/thinking about it, but I’ll share those in another post, since after I add our videos, this piece will already take you 7 hours to read it! Thanks for hanging in there–it’s worth it, I promise!!
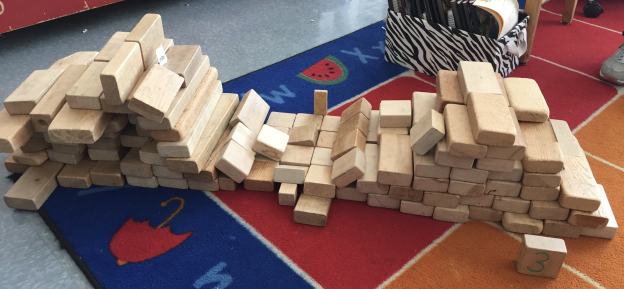
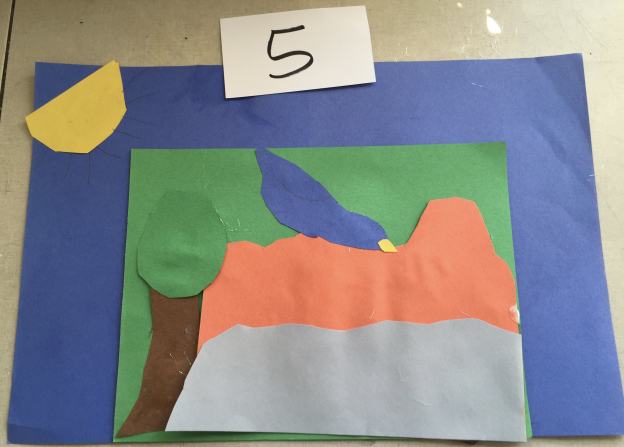
I shared some building challenges we had done a couple of weeks ago, where we solidified our understanding of both bodies of water and landforms. We still had some thinking to do, as well as demonstrating that we understood the difference between slow changes and fast changes that happen on Earth. Besides using things like Legos, big blocks, pattern blocks, and other things to build with, we often incorporate art into our science and social studies work and represent ideas with pictures. This was one of those times. It was a mural/collage project, much like these that have happened in 5th grade (with both regular units as well as with test preparation).
Our first step was to jot down what we remembered about slow and fast changes we’d already learned about. We made this chart together:
We brainstormed what we knew about the difference between slow/fast, as well as examples of each, and the causes for these effects on the land: wind, water and ice. Their directions were then to create a representation (2D with paper and other art supplies) that everyone could recognize and explain when they looked at the poster. No words (except for the two parts of EROSION and WEATHERING since these were important vocabulary terms) were allowed.
While kiddos worked, they went through the design cycle as they planned, created, tested (by sharing their representation with another group or two to see if others could recognize the concept they were trying to display), redesigned and then shared by putting their creation on our poster. This mural did a couple of things for Rm. 202 learners–helped them solidify understanding of concepts, demonstrate that understanding, as well as remind them of that learning as they connect the picture to the idea in their heads. I plan on using the images on this poster as a part of our assessment at the end of the unit (I just haven’t fleshed out exactly what that will look like yet…still in the design phases!).
Here are the images on our mural. Can you tell what each of them represent?
Each one up close. Half are slow changes and half are fast changes. Oh, and there is one image that we thought was an example of both:
I was really impressed with the diligence portrayed while they worked on this project. There were a couple of pairs who had to go through 2 or 3 versions of their creation before they figured out one that made sense to someone but themselves. There was lots of cooperation and suggestion that happened during our work session, too, as kiddos bounced ideas off each other, shared supplies and asked other pairs for help. Another example of an engaging, motivating and focused way to practice science without pencil/paper or just reading about it. Way to go, Rm. 202 scientists!
If you want, leave us a comment about what you think our pictures are images of. We’d love to share our learning with you. What questions do you have? We’re becoming experts on these ideas of forces that shape the land! 🙂
Last week we tried a challenge in Science where kiddos had to create a representation of a body of water. Since then, I’ve heard multiple times “When are we doing this again?” Then, when my friend, Mona, asked me if I was planning on doing the same thing with landforms I knew we just had to!
I didn’t want to make the situation exactly the same, however, so I thought of ways I could change the parameters to up the level of the challenge. Last time, students chose their own group, as well as the materials they used to build. It was great that somehow everyone chose something different and there was no arguing about who used what. That doesn’t happen a lot in our room, but I was super glad it didn’t come up here. So this time I again let them choose who they worked with (which because of numbers was groups or 2 or 3), but there as more chance in both their landform AND their building material. I wrote the choices on index cards (very high tech, I know) and put them in two cans. Each group chose one from each container.
I was impressed with how easily kiddos accepted both of the cards without complaining. Again, not much of that happens with Rm. 202 friends, but I was pleased with how quickly they got to work planning their next moves. After about 3-4 minutes, most were ready. There was only one pair who did fuss a teeny bit about how they’d be done really fast and how their cards were not a challenge. We talked about how that meant that they needed to figure a way to challenge themselves, ask themselves “What could we do differently than we had originally planned?”
Much like last time, they had 25 minutes to work on their representations and then we’d do a gallery walk to see if we could guess what everyone had created. They were to work for the entire time and had to use their assigned medium, but other than that there weren’t too many rules.
Ok, here’s your chance to see if you can figure out our landform creations, and then I’ll give you the answers.
What do you think? Did you guess them? Here are the answers:
plains
hills
valley
barrier islands
canyon
plateau
mountains
We love how building challenges work for learners in Rm. 202, and we want to know how they work for you. Any stories to tell us? What suggestions do you have for future design challenges we could try?
We have been studying Earth and how it changes. We’ve talked about slow changes like weathering and erosion; fast changes like earthquakes, volcanoes and floods; landforms like plateaus, mountains, plains, barrier islands (which I have to admit I didn’t really know about!); and about bodies of water. Because we needed to breathe a little bit of life into our work after having been discussing and watching videos for a few days, and because I know my kiddos are builders and creators at heart, I tried to figure out a design challenge of sorts that we could try. There were many options I could have employed (and still might), but I thought that bodies of water would be a nice place to start.
So kiddos chose groups (in 4s) and then I explained their job: Create a representation of the body of water they get (I passed out cards to each group) so that everyone else can guess what it is. They had options for research before they got started if they needed clarification on the characteristics of their body of water, and they could use whatever supplies in our room that they wanted. There was a 30 minute time limit.
So do you think you can guess what each one is? Try it out. Here is body of water #1, a picture and a video (oh, and the video might have a spoiler, so guess before you watch it!):
Ok, here’s #2:
Try it with group #3:
Group #4 made this:
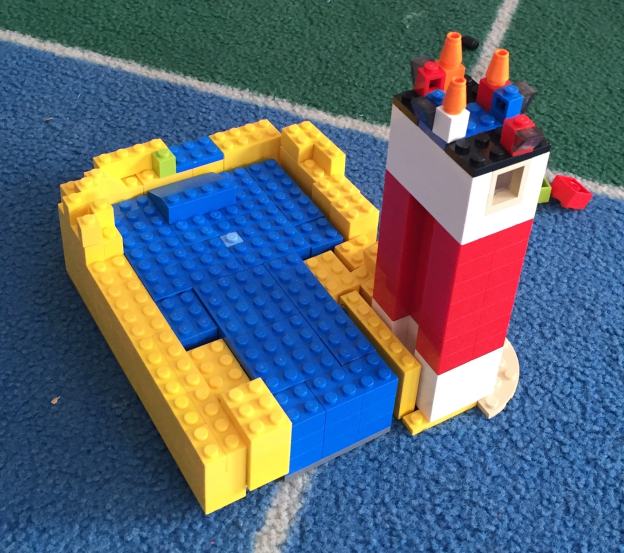
Check out #5, made with Legos:
Ok, and now that you’re done, check your answers. Promise that you’ve tried it?
#1–ocean #2–creek #3–lake #4–river #5–bay
The best part? We had fun, we learned alot and the only thing I’ve heard since we finished is “When are we going to do this again??” 🙂
We had an amazing 1st-day-back-from-Spring-Break today! Our principal, Mrs. Sisul, has been learning about engineering and STEM with Legos, and volunteered to come set us up with some Lego challenges if we were interested. Well, yes, of course, Rm. 202 friends were interested! Luckily she was free this afternoon and came on up with her big ‘ole box of Legos! Check out what happened! 🙂
She started with a quick reminder of what STEM means (Science, Technology, Engineering and Mathematics), and then introduced what we would be doing: every kid would get a card with a challenge and they would work to do that challenge with Legos. Pretty straightforward, right? Well, they she led us through a great line of thinking about how we work best, and how kiddos would have the choice of how they tackled the challenge: alone, with a partner, a group of 3, a group of 4–whatever worked for each kiddo. She shared her example that she knows that as a learner she likes to be able to bounce ideas off of another learner, and so she’d focus on finding another person to work with. She asked me to share my strategy, and I talked about how I knew that that plan would DEFINITELY not work for me. I am the kind of learner who needs to process and plan by myself first, and then I might want to work with someone else to blend ideas, get a critique or ask a question. I know that if I went with a partner right off the bat, I wouldn’t have anything to share with them–so if I was Mrs. Sisul’s partner, I wouldn’t be a very helpful partner! Right off the top I could tell that Rm. 202 kiddos were thinking about what would work for them, and they knew what would be best. We had all sorts of groups–singles, partners and groups of 3. Some kiddos worked alone, but right next to another friend so they could get feedback that way.
Ok, once teams were developed, Mrs. Sisul gave the guidelines for how kiddos would get their Legos. She walked them through a planning session where they were to really think through what kinds of Legos they’d need. She would call names of kiddos 3-4 at a time, and they’d have 30 seconds to “block shop” and then get started. Once everyone had an initial visit to the pile, they were free to come back for more. And since it would be virtually impossible for me to explain the amazingness with which these kiddos followed this protocol, I had to record it. Check out what it was like when Mrs. Sisul dumped the Legos:
Once we got started, I roamed around and got some footage of them working. I know, kiddos wanted me to do the challenges, too–but I couldn’t document it to share with you if I did that! Maybe next time. 🙂
Here are some videos that share more of their thinking while they got started:
This one has some great thinking about what happens when things are hard (which this was for some of us!):
There’s one more, and it’s really the one I’m the most tickled about. It’s an example of what happened in our room when we put 20 kids and 2000 Legos together. I want you to think about what you see first, but then I’ll tell you why I liked it:
As I watched this video, I noticed these things:
quiet voices
pleases and thank yous
kiddos finding pieces for others
sharing
everyone just taking what they needed
no one grabbing, hogging or arguing
kiddos respectfully letting others into the circle
What did you see? (Please leave us a comment and let us know–Rm. 202 kiddos would LOVE to hear what you thought and would LOVE to know you watched their super hard working!)
Ok, I know you’re wondering what some of those challenges looked like, and how they tackled them. Here are some examples. And yes, they told me I could. 🙂
This was definitely one of those touchstone moments in our classroom that we will return to for many days and weeks to come (darn, I only wish we’d done it earlier in the year!). I know that we walked away with many things (and I hope to share what those were in THEIR WORDS soon), but one of them definitely was that there is not one way to solve a problem. We could each access each of these challenges in our own way, and use whatever skills, ideas–and Legos!–that we wanted to in order to achieve our goal. One friend even decided to do the same challenge twice to make it even harder for himself! We are builders and thinkers and problem-solvers in Rm. 202 and this was definitely right up our alley! Come back any time, Mrs. Sisul!
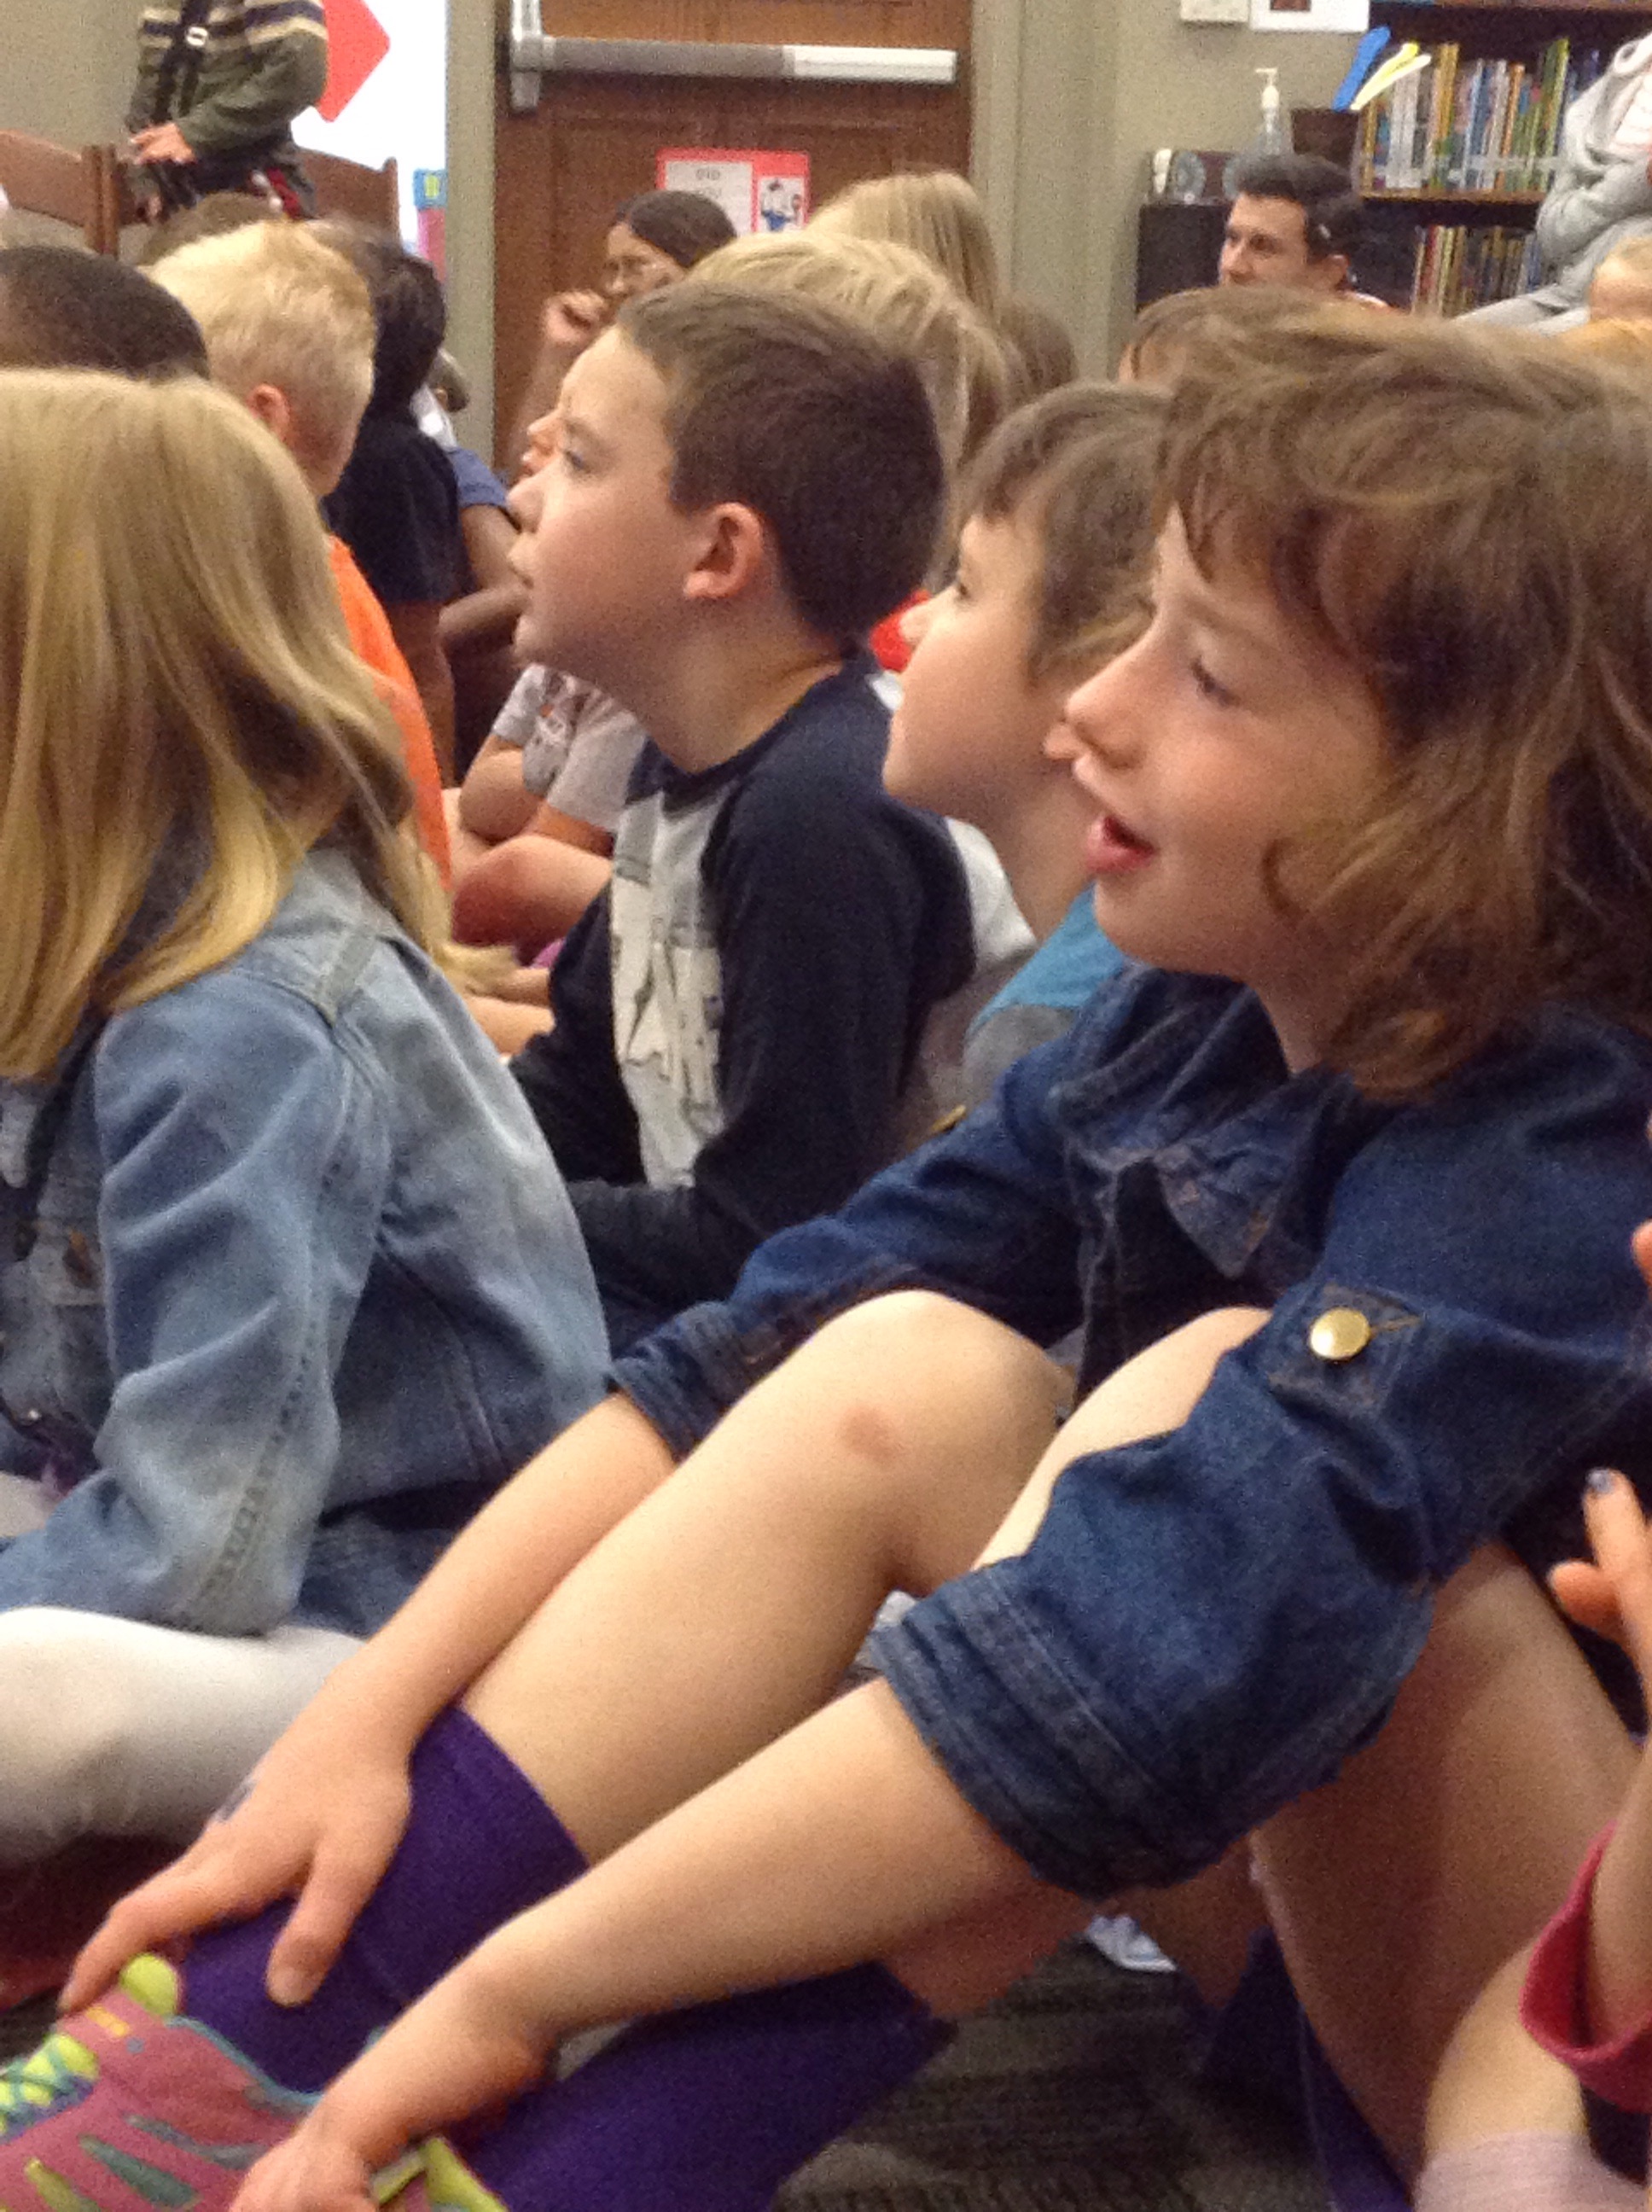
I am really starting to love this whole picture-of-the-day thing. Some days’ pics are better than others, but as a whole, I think it’s encouraged me to think about the day as a whole in a new way. Eventually (or maybe next year!), I would love to have kids in charge of what our POD is each day. 🙂
Engagement is a GREAT thing, and you can see it all over these faces! Don’t you just love that little smile on Emily’s face? We thoroughly enjoyed the stories we heard as part of the Storytelling Festival today!
Look at those proud smiles! 🙂 You did it!
Then there’s the Science Fair. 🙂 Lauren and Millie worked together (with Millie’s little sister) to create a SUPER project for the Robinson STEMfest, which then went on to the Greater StL Science Fair and got a RED RIBBON! WOOHOO!! Like Lauren’s mom said, “Red means ROCK’N!!” Way to go, girls!

 What a great day we had! 🙂